


This article will not just give you enough information about How to Make Pcb CNC Machine at Home. But it will also guide you through some great step-by-step procedures that can help you build a CNC machine at home with a little amount of money.
How can I cut a PCB using a CNC router?
There are many ways to cut a PCB using a CNC router. Some are more affordable than others, and some are easier than others.
You can use a router with a cutting bit, which is similar to a drill bit. You put the PCB into a vise or clamp it down on your workbench, and then run the router over it while applying pressure on the top. This method works well for small boards like those used in electronic projects.
Another way of cutting PCBs is to use a laser cutter, which uses an infrared beam to cut through the material. Laser cutting works well for large boards that need more precision, but it is not as fast as using a CNC router with a cutting bit.

Make Your Own PCBs on an Inexpensive Desktop CNC Milling Machine
The idea of making PCBs on an inexpensive CNC milling machine is a great one. You can get a cheap CNC from eBay for $400 or less and that should be enough to do the job.
The problem is that you will probably have to do some extra work to make it work for PCBs. If you buy a used CNC milling machine, then there’s no guarantee that it will work well with PCBs, or that it will work at all.
You would be better off buying one of the new FDM 3D printers that have been designed to print PCBs directly. These printers are much more expensive than a CNC milling machine but they are easier to use and they produce high-quality boards every time.
If you’re serious about making your own PCBs then I suggest you get one of these 3D printers instead of trying to make your own CNC machine into a PCB manufacturing device.
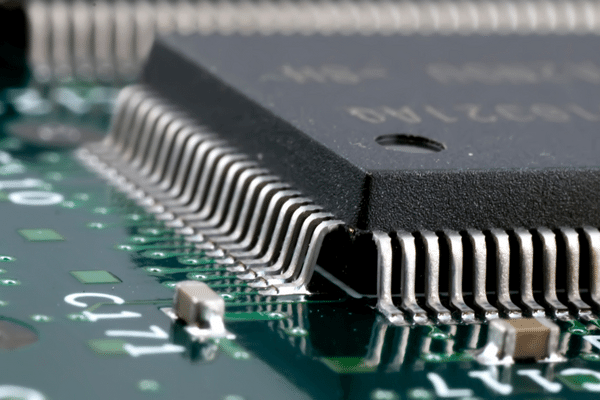
Engraving, drilling, and cutting the homemade PCBs
The drill press I use is a very basic model from Harbor Freight. It doesn’t have a lot of features, but it does the job.
If you want to cut the board using a laser cutter, it’s best to use 1/16″ thick FR4 boards. If you are going to use a Dremel tool or other rotary tool, you can use thinner material (0.062″ thick).
For engraving and drilling, I would recommend using the following tools:
Drill Press – if you don’t have one already, get one! They’re cheap and they make your life so much easier! For example, instead of trying to hold your workpiece on a bench vise while drilling holes in it with a hand drill or Dremel tool, now all you have to do is clamp your piece into the drill press vice and start drilling away!
Dremel Tool – this tool makes short work out of drilling and cutting tasks because it has several different attachments that allow you to use different bits in them (a regular drill bit wouldn’t fit inside the Dremel). These include diamond cutters for cutting through hard materials such as metal; carbide cutters for cutting through soft materials such as wood;

Make G-Code for a Board
G-Code is the programming language used by CNC machines and other computerized machinery. It is a numerical control language, which means that it uses numbers to represent instructions.

G-code is not specific to any machine, but the specific commands in G-code vary from one type of machine to another. For instance, there are different G-code programming languages for CNC routers and CNC mills.
There are many different types of CNC machines on the market today: milling machines, laser cutters, 3D printers, and more. These machines use G-code programs to create parts. This can be done by manually entering the code into an interface or by using software such as Autodesk Fusion 360 or Inventor HSM.
The G-codes that are needed for each particular type of machine will be different because they all have different functions and capabilities. The most common G-codes in use today include:
G00 — Move at constant speed in a straight line until another command is received (used for positioning).
G01 — Same as above except that you can specify the distance after which it will stop moving (this can be useful if you’re making multiple passes over something).
Load G-Code and Zero the Mill and Probe
Load G-Code and Zero the Mill
To load G-code, use the menu File -> Load G-Code (or press CTRL + O).
You can then open one of the example g-codes (which is located in the ‘code’ folder) by clicking on it and pressing enter.
The g-code will be loaded into the machine controller, and you should see a progress bar as it loads.
When it has finished, you will see a message saying “GCode loaded”. You can press enter again to close this window.
Zero The Mill And Probe
To zero the mill and probe, press the button called “Zero” on your touchscreen or hit CTRL + Z on your keyboard.
When this is complete, there will be a message saying “Mill zeroed”.

Get ready to Probe for Surface Height
You can use this to probe the surface height of your PCBs, which is especially useful when you are making a DIY PCB CNC machine.
The design is based on the Makerbeam M3 connector blocks. The probe has three M3 threaded holes: one for the Z axis and two for the X axis. You can insert an M3 nut into these holes and secure them using a wrench.
This probe has a diameter of 6mm (M3 nut), which means you can use it with most PCBs or other materials. The length is approximately 35mm, so you can use it to find the surface height from 35mm away from your workpiece.
Hold Down Copper Clad Stock on CNC’s Spoil Board
The problem is that the copper-clad stock is not flat. It has a convex shape. The bottom of the board is concave and the top of the board is convex or bulges out. This causes all sorts of problems when trying to hold it down on a spoil board during CNC machining.
When you push down on a copper-clad board with a CNC milling machine, it will bend slightly and spring back up again when you release it. This makes holding it down difficult, as the spring effect means that any force exerted against it will be met with equal and opposite force in return, so your machine will vibrate or even break if pushed too hard!
The solution? Put a single piece of thin plywood (or similar) underneath every other bolt head along one side of your spoil board. The plywood should be positioned such that when you tighten down each screw, it squeezes against this thin piece of wood instead of pushing against the copper-clad stock itself.
Conclusion
I will tell you the best ways to make a Pcb CNC machine. Here we will discuss the Pcb CNC machine from the beginning. We need to look for different things like the software and the hardware. We will start with the software part. To engrave you must use Autocad, Solidworks, etc. After that, you must make a design for your Pcb and then convert it into G code which is used in CNC machines. Before starting to cut you must give power to your board machine so that it starts heating. During this time, you can’t add any material to the machine because it will burn if the temperature is high. So patience is necessary here because after turning 15-20 minutes, everything is ready and the machine is ready to operate.